Welcome to our informative guide on how to activate your Panoramic WiFi Gateway for optimal internet performance. In today’s digital age, a reliable and high-speed internet connection is crucial for both work and leisure activities. The Panoramic WiFi Gateway is a cutting-edge device that can enhance your internet experience by providing faster speeds, wider coverage, and greater control over your network.
Activating your Panoramic WiFi Gateway is a simple process that can be completed in just a few easy steps. Whether you’re a tech-savvy individual or a beginner, this guide will walk you through the process and ensure that you can enjoy the full benefits of your WiFi Gateway in no time.
By following our step-by-step instructions, you’ll learn how to activate your Panoramic WiFi Gateway, connect your devices to the network, and optimize your internet performance for seamless browsing, streaming, and gaming. So let’s dive in and discover the easy steps to activate your Panoramic WiFi Gateway!
Discover the Easy Steps to Activate Your Panoramic WiFi Gateway for Optimal Internet Performance
If you are tired of experiencing slow internet speeds or dead spots in your home, activating your Panoramic WiFi Gateway can be the solution you’ve been looking for. This powerful device not only provides a stable and reliable internet connection but also offers enhanced performance for all your online activities. In this article, we will guide you through the easy steps to activate your Panoramic WiFi Gateway and optimize your internet performance.
Step 1: Unboxing and Connecting the Gateway
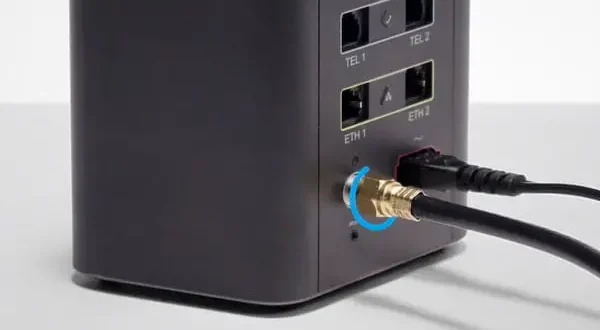
The first step is to unbox your Panoramic WiFi Gateway. Inside the box, you will find the Gateway, power adapter, Ethernet cable, and a quick start guide. Before proceeding, ensure that you have a working broadband connection and an active account with your internet service provider.
To connect the Gateway, simply plug one end of the Ethernet cable into the Ethernet port on the Gateway and the other end into the Ethernet port on your modem. Then, connect the power adapter to the Gateway and plug it into a power outlet. Wait for a few minutes until the Gateway boots up and establishes a connection with your internet service provider.
Step 2: Activating Your Panoramic WiFi Gateway
Once the Gateway is connected and powered on, open your preferred web browser on a device connected to the Gateway’s WiFi network. In the address bar, type “http://10.0.0.1” and hit Enter. This will take you to the Gateway’s activation page.
On the activation page, you will be prompted to enter your account information provided by your internet service provider. Fill in the required fields accurately, including your account username and password. Double-check the information to ensure its accuracy.
After entering your account information, click on the “Activate” or “Submit” button. The Gateway will then authenticate your account and establish a connection with your internet service provider’s network. This process may take a few minutes, so be patient.
Step 3: Configuring Your WiFi Settings
Once the Gateway is successfully activated, you can proceed to configure your WiFi settings for optimal performance. From the Gateway’s management interface, you can set up a unique network name (SSID) and password for your WiFi network. It is recommended to choose a strong password to ensure the security of your network.
You can also customize advanced settings such as bandwidth allocation, parental controls, and guest network access to meet your specific requirements. Exploring these options will allow you to personalize your WiFi experience and maximize your internet performance.
Step 4: Testing and Troubleshooting
After configuring your WiFi settings, it is crucial to test your internet connection and ensure that everything is working as expected. Use a device connected to your WiFi network to browse websites, stream videos, and perform other online activities. If you encounter any issues, refer to the troubleshooting section in the Gateway’s user manual or contact your internet service provider for assistance.
By following these easy steps, you can activate your Panoramic WiFi Gateway and enjoy optimal internet performance throughout your home. Say goodbye to slow speeds and dead spots, and embrace a seamless online experience with your newly activated Panoramic WiFi Gateway!
In conclusion, activating your Panoramic WiFi Gateway is a simple process that can greatly enhance your internet performance. By following the easy steps outlined in this article, you can ensure that you are getting the most out of your WiFi connection. Whether you are a casual internet user or rely on a stable connection for work or entertainment, activating your Panoramic WiFi Gateway is essential for optimal internet performance.
By activating your Panoramic WiFi Gateway, you will experience faster speeds, increased coverage, and improved reliability. This means smoother video streaming, faster downloads, and a better overall internet experience. The step-by-step instructions provided in this article make it easy for anyone, regardless of technical expertise, to activate their Panoramic WiFi Gateway and enjoy these benefits.
So why wait? Take advantage of the easy steps outlined in this article and activate your Panoramic WiFi Gateway today. Say goodbye to slow internet speeds and unreliable connections, and hello to a seamless online experience. With just a few simple clicks, you can unlock the full potential of your internet connection and enjoy optimal performance like never before.